- Joined
- February 8, 2003
- Messages
- 9,814
- Reaction score
- 98
- City, State
- Sacramento, CA 95827
- Year, Model & Trim Level
- 1992 XLT
Ok... this thread is all about a complete front brake job on a 1st Gen Explorer (92 to be exact)....I will do one side... pads, caliper, slides, rotor and bearings....
That said let me explain... I have a 92 Explorer... while it has 210K on it, the brakes have always been pretty well maintained.... well last week, suddenly I had an awful raspy sound from the driver's front whenever I applied the brake. It happened on the way to work. I drove it there and back home.... and parked it. I knew the worst. I had probably spun off a slim remnant of a pad friction friction on a riveted brake pad. (I was right). So for a day I was metal on metal. Long enough to make the rotor trash. Why didn't I catch it? I checked the outer and it was doing fine. The inner was not (more on this later)
So I bought a new rotor (with bearing races), new pads and a grease retainer for the inner bearing. This thread will chronicle the tear down and reassembly.
There were a couple things I did not do because I didn't have material or time, but I will explain those and probably do them at a future date. I hope this will make the job easier for those who have never done it.
Here we go.
remove the cover and the lug nuts....

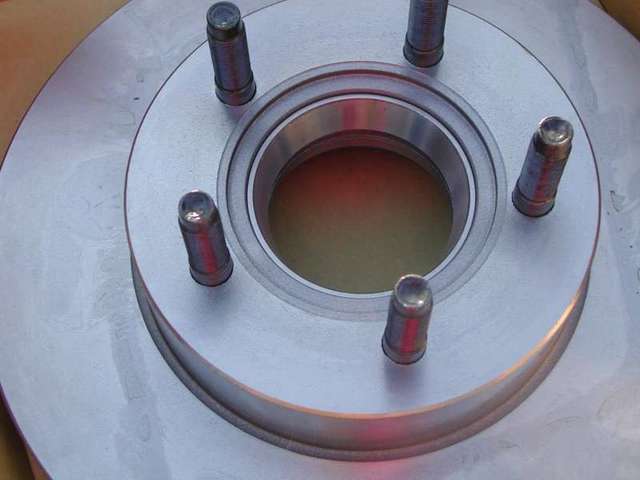
remove the wheel, and you are left with this:

The outer part is held in place by the lug nuts, so it simply comes off....

Now we see the spindle and the automatic inner hub... greasy mess. Let's look at the caliper now.... this is going to need to come off next....
Here is the caliper inspection port...

Even from this angle you can see the piston is way out.... betting it is the back pad that is bad....
Here is another view, we can see the outer pad has some meat on it...

The half of the caliper that contols the piston and pad apply can be removed separate from the part bolted to the car. There are two "caliper slide guides" or pins... there are two pieces of metal with a cream (ok ok rubber) filling.

You can pound this out... pounding each inward and once it compresses then pound it thru the other side....

Here is the slide... this one is a little corroded, needs to be replaced.. I greased and reused it, but will come back and replace it later.Note the "one way" nibs pointed at by arrows... these need to be compressed down to pound it pound it out... hammering one at a time under the guide groove works nicely...

[edit note: jgbils added the following comments in a PM to me and I think it belongs here:
I found that while you have all the parts off, its a good idea to have a tub of paint thinner to soak the metal parts in to clean them off (no use putting a dirty part back on) Also, if that magnetic "key" won't budge, it helps to turn the spindle nut a little back and forth to relieve pressure off of it.
As far as getting the slides out, I have found a Vicegrip, small hammer and a flathead screwdriver work wonders(compress the outer side of the slide pin with the vice grip, tap it with the hammer to push it in past the bumps, then just insert the blade of the screwdriver on one of the metal sides of the pins and hammer it the rest of the way out)
Thanks !!
continuing:
Remove both slide pins and then work the outer caliper assembly free.... may take some ingenuity and a couple screwdrivers. It will come loose and out. Here it is out...

NOTE: Do not dangle it from the hose. Find a place to park it or use a wire to suspend it. In the stationary part will be the rear pad, remove it but sliding it inward and out of the slot it uses.
Take a look at this one... WOW, TOAST!

check what it did to a rotor in one day! I was driving a lathe!

Every rotor has a minimum thickness that it can be turned to... these grooves were SOO deep this rotor was unturnable... toast.
There are two bolts that hold the caliper on the spindle. They use blue locktight and you will probably need a 1/2 inch breaker bar to get them off...
Once those 2 bolts are removed you have to remove the stationary part of the caliper.
Ok, so the caliper is off... next is the rotor. This includes inner and outer bearings (good time to clean and repack)
Let's walk thru this...
THere is a plastic/steel inner Hub assembly... there is a spring garter around it. and it can be tough to get back on (I have a secret that makes it easy)
Here I am using a pick to show how it can move on the spindle...

Here I am using a screwdriver to separate it....

yet it will not come off yet. Why?

This retaining ring.... or partial snap ring... it has to come out (as easy task...) and then there is a washer behind it that has to come off....

Once this is off, the hub assembly easily slide out and off

what is left can be confusing... there is a gland nut that the pressures the bearing... (more later on reassembly) looks like it oughta come right off... WRONG! Why not? There is a little hidden key... marked by the A arrow...

some books say to use a magnet (yeahsureright) I find that by using a pick of some type at point B, it comes out easily - you can move the nut a little if it seems stuck in place...My success with the "magnet" has not been stellar - the pick works easier.

and here is that little bugger... out...

with that out the nut can be removed by hand (usually). If you NEED a socket, it's a BIG one - 2-3/8 inch!

(bearing shown by arrow)

Once that is off, the outer bearing can be removed

which leaves you with the spindle stub.... APART !!! (phase one)

Clean the parts (my slide pins were not the best, so I polished them a little and made plans to replace them with new ones soon, and reused them). I find brake cleaner works well. I try and buy it by the case when you can get it for $1 or $1.50 a can.. I use it on brakes and transmissions and most other cleaning jobs too. Gasoline works well for bearings.
Once the bearing is clean, inspect it... we're looking for scoring on the rollers, or any bluing, or other sign of overheating. This one is fine (they usually are - don't EXPECT trouble, just look is all. If you find something, then replace the bearing, but you likely won't.

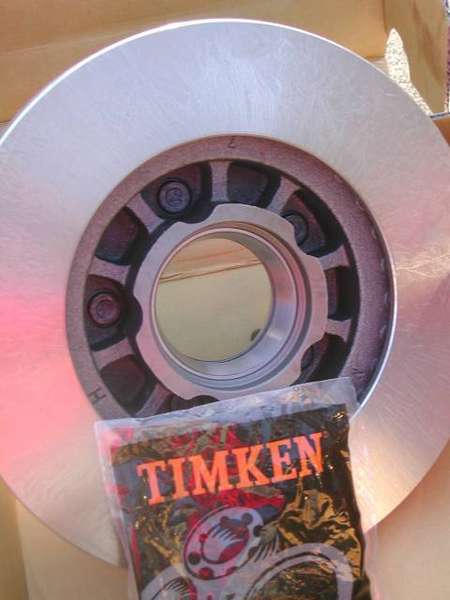
Now it's time to put it all back together. When you buy your rotor, it will have some sort of anticorrosion coating. This needs to come off... so we will strip it with brake cleaner. Note the fact the rotor has bearing races... make sure the one you buy has em!
Here is the new rotor and the new rear grease seal.. if you look you can almost make out the anticorrosion coating
Here we are cleaning it off

I also used paper towels, and did both sides. I cleaned the bearing, and repacked it with moly grease. I didn't photo this part, but you have a couple of options. One is to use a needle on the grease gun. Another is to use a bearing packer and hook it up to the grease gun and the last is to use the "old fashioned method" by hand. To do this start with a clean bearing, but some grease on the heel of your hand, and nibble into it using the outer wide edge of the bottom of the bearing.. pushing the grease up through the bearing with successive small "bites" as you push down into the grease. Continue until it comes out the other side.
You can now insert the bearing into the rotor

Next carefully put the seal in place... level onto the bore.... don't get it ****ed.
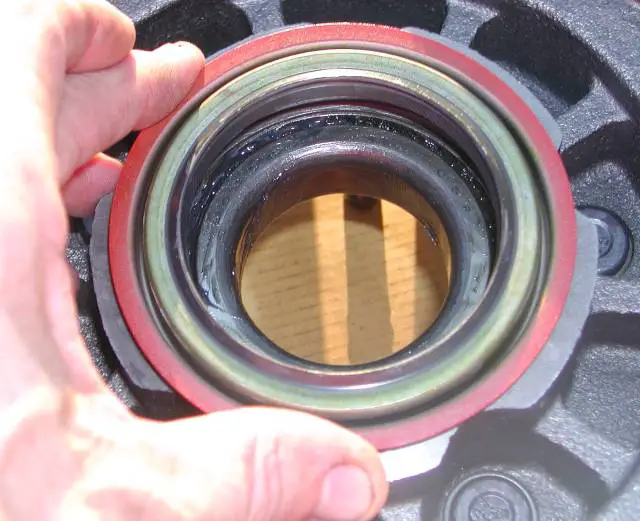
NOW.... you can use a hammer and pound it down by hitting it all around the circumference... be careful not to misalign it. Or they make tools (this one was $10) that come with a zillion sized front pieces. Pick the one that fits your outer bearing diameter and a couple smart whack will drive the grease seal right in. Not essential, just nice.

Here is the bearing and seal all in place... the rotor is ready to go on the spindle.

I'll clean it once more...

Normally I'd prepare the caliper assembly at this point, but since we are talking ROTOR, let's put it on...
Clean the spindle (wiping it clean is enough) and install the rotor onto the spindle...then add the front side bearing (cleaned and relubricated as before with the rear)

then add the nut...tighten it hand tight

Notice the clean hands? I cleaned my hands before greasing the bearings, and then again after to clean the rotor. Brake jobs usually involve getting your hands incredibly dirst repeatedly, or I've recently taked to using latex disposable gloves (didn't have them for this job)
The bearings need to first be "seated" and then properly tightened. You can do this with your hands and a large water pump plier, but I have the proper tools so let's see how this all works...
Here are the tools (if we are going that route)

an inch lb torque wrench adapters and the 2-3/8's socket. Initially I tighthened the bearings to 20 FOOT pounds while I rotated the rotor... then I backed it off, and tightened it to 20 INCH pounds (finger tight basically... just using the tips of your fingers).

Next I inserted the little keeper... it might need you to adjust the nut slightly to get it to fit... that's ok.

Next the inner hub assembly... make sure the little square in lined up with the keyway (you can't get it wrong, just waste tome time trying to figure out why it isn't going on)

slide it on as far as you can. You will feel the garter spring starting to resist your effort. Get a socket that JUST fits the inner part of this hub (or a suitable pipe) and one whack with a hammer and voila! It's on.

Next the washer

Here is a pic showing iinstallation of the snap ring. Don't panic when you go to install the half snap ring... and find the slot is not wide enough. That shaft slides in and out.. pull it out and voila, you have the full slot to put the snap ring back into!

Here we are, all back together (top arrow shows washer, lower arrow snap ring, and in and out arrow as a final reminder that the shafy will move in and out slightly)

The outer hub you may have to rotate until it seats. There may be slight spring pressure holding it SLIGHTLY proud, but play with it and you'll know what the proper position is when you find it.

Ok let's turn our attention to the caliper. The outer pad is held into the caliper by two spring steel "ears" It's not tough to remove. The rear pad will stay in the caliper mount you have to reach back and slide it out... also easy.
WHen you have the pad gone, you have a piston extended to accomodate wear. The new pads will be full thickness, meaning your piston needs to go back IN to it's bore... There are several ways to do this. A Big C-clamp is an easy one. Large water pump pliers (used carefully) work. You MIGHT get brute force to work. Easiest of all is a tool made JUST for this purpose. It costs $35 or so. Here is that tool kit...

Here it is installed prior to pushing the caliper piston back in

NOW..THIS IS IMPORTANT! You will need space for the brake fluid in the master cylinder reservoir. So, before you push the caliper back, remove some fluid (good old turkey baster - useful tool). I usually remove as much as I can and use this opportunity to add fresh brake fluid to the reservoir.
[NOTE] Here is something I never thought of on the newer vehicles with AWABS... probably good advise for ALL ABS cars (even an old DOG learns thing from this forum. This is from CDW6212R:
Tips: On ABS vehicles, don't push the calipers back in with the bleed screws closed. The fluid in the calipers is the source of dirty fluid, which can ruin the ABS pump. Always open those bleed screws while compressing the pistons
Great tip, thanks CDW !
Continuing:

Don't get this on your paint!!
Once you have done this.. push away. Here is the piston fully retracted.

Now the fact I wore out pads on one side with a lot of lad left on the other means the caliper was stuck.... SO I wanted to clean up the grooves on both parts... first the caliper itself

and then on the mount, which I reinstalled using blue locktite... THIS IS IMPORTANT
here is the cleaning of the groove on the mounting side

Once cleaned I lubed the grooves (and cleaned up the slide pin and lubed it too) with caliper slide grease - then I cleaned my hands, again. With clean hands, I slide the back pad into place - the triangle shows the slot (there is one top and bottom) that the pad slides into. I also added some anti squeal good in the area where the caliper piston encounters the pad. The square indicates you slide it in (duh).

Now put the dog eared pad onto the caliper... and slide it into place in the mounting bracket attached to the vehicle.... next we drive the lubricated caliper slide pins back into place... they will stop once they are in...

Recheck the brake fluid in the master cylinder. Put the tire back on... have a cold one - YOU ARE DONE!
Oh and, this thread is PROOF I DO get my hands dirty! Speaking of which, get some goop, or other hand cleaner, and pick up some disposable gloves... you will be glad you did. This is a DIRTY job.
[Edit] Someone asked the costs. The new Rotor from Autozone with races was $35. The seal was $9. Pads, well a set will run between $40 and $60 depending. You will need 2-3 cans of brake cleaner, ($7 or so total - unless you do like me and buy a case when a great sale comes along and can get it half price) Also some caliper slide lube (.99) and some wheel bearing grease ($4-5). A can of brake fluid might be added to the list as well ($3)... oh and don't forget hand cleaner, you will NEED IT !
That said let me explain... I have a 92 Explorer... while it has 210K on it, the brakes have always been pretty well maintained.... well last week, suddenly I had an awful raspy sound from the driver's front whenever I applied the brake. It happened on the way to work. I drove it there and back home.... and parked it. I knew the worst. I had probably spun off a slim remnant of a pad friction friction on a riveted brake pad. (I was right). So for a day I was metal on metal. Long enough to make the rotor trash. Why didn't I catch it? I checked the outer and it was doing fine. The inner was not (more on this later)
So I bought a new rotor (with bearing races), new pads and a grease retainer for the inner bearing. This thread will chronicle the tear down and reassembly.
There were a couple things I did not do because I didn't have material or time, but I will explain those and probably do them at a future date. I hope this will make the job easier for those who have never done it.
Here we go.
remove the cover and the lug nuts....
remove the wheel, and you are left with this:
The outer part is held in place by the lug nuts, so it simply comes off....
Now we see the spindle and the automatic inner hub... greasy mess. Let's look at the caliper now.... this is going to need to come off next....
Here is the caliper inspection port...
Even from this angle you can see the piston is way out.... betting it is the back pad that is bad....
Here is another view, we can see the outer pad has some meat on it...
The half of the caliper that contols the piston and pad apply can be removed separate from the part bolted to the car. There are two "caliper slide guides" or pins... there are two pieces of metal with a cream (ok ok rubber) filling.
You can pound this out... pounding each inward and once it compresses then pound it thru the other side....
Here is the slide... this one is a little corroded, needs to be replaced.. I greased and reused it, but will come back and replace it later.Note the "one way" nibs pointed at by arrows... these need to be compressed down to pound it pound it out... hammering one at a time under the guide groove works nicely...
[edit note: jgbils added the following comments in a PM to me and I think it belongs here:
I found that while you have all the parts off, its a good idea to have a tub of paint thinner to soak the metal parts in to clean them off (no use putting a dirty part back on) Also, if that magnetic "key" won't budge, it helps to turn the spindle nut a little back and forth to relieve pressure off of it.
As far as getting the slides out, I have found a Vicegrip, small hammer and a flathead screwdriver work wonders(compress the outer side of the slide pin with the vice grip, tap it with the hammer to push it in past the bumps, then just insert the blade of the screwdriver on one of the metal sides of the pins and hammer it the rest of the way out)
Thanks !!
continuing:
Remove both slide pins and then work the outer caliper assembly free.... may take some ingenuity and a couple screwdrivers. It will come loose and out. Here it is out...
NOTE: Do not dangle it from the hose. Find a place to park it or use a wire to suspend it. In the stationary part will be the rear pad, remove it but sliding it inward and out of the slot it uses.
Take a look at this one... WOW, TOAST!
check what it did to a rotor in one day! I was driving a lathe!
Every rotor has a minimum thickness that it can be turned to... these grooves were SOO deep this rotor was unturnable... toast.
There are two bolts that hold the caliper on the spindle. They use blue locktight and you will probably need a 1/2 inch breaker bar to get them off...
Once those 2 bolts are removed you have to remove the stationary part of the caliper.
Ok, so the caliper is off... next is the rotor. This includes inner and outer bearings (good time to clean and repack)
Let's walk thru this...
THere is a plastic/steel inner Hub assembly... there is a spring garter around it. and it can be tough to get back on (I have a secret that makes it easy)
Here I am using a pick to show how it can move on the spindle...
Here I am using a screwdriver to separate it....
yet it will not come off yet. Why?
This retaining ring.... or partial snap ring... it has to come out (as easy task...) and then there is a washer behind it that has to come off....
Once this is off, the hub assembly easily slide out and off
what is left can be confusing... there is a gland nut that the pressures the bearing... (more later on reassembly) looks like it oughta come right off... WRONG! Why not? There is a little hidden key... marked by the A arrow...
some books say to use a magnet (yeahsureright) I find that by using a pick of some type at point B, it comes out easily - you can move the nut a little if it seems stuck in place...My success with the "magnet" has not been stellar - the pick works easier.
and here is that little bugger... out...
with that out the nut can be removed by hand (usually). If you NEED a socket, it's a BIG one - 2-3/8 inch!
(bearing shown by arrow)
Once that is off, the outer bearing can be removed
which leaves you with the spindle stub.... APART !!! (phase one)
Clean the parts (my slide pins were not the best, so I polished them a little and made plans to replace them with new ones soon, and reused them). I find brake cleaner works well. I try and buy it by the case when you can get it for $1 or $1.50 a can.. I use it on brakes and transmissions and most other cleaning jobs too. Gasoline works well for bearings.
Once the bearing is clean, inspect it... we're looking for scoring on the rollers, or any bluing, or other sign of overheating. This one is fine (they usually are - don't EXPECT trouble, just look is all. If you find something, then replace the bearing, but you likely won't.
Now it's time to put it all back together. When you buy your rotor, it will have some sort of anticorrosion coating. This needs to come off... so we will strip it with brake cleaner. Note the fact the rotor has bearing races... make sure the one you buy has em!
Here is the new rotor and the new rear grease seal.. if you look you can almost make out the anticorrosion coating
Here we are cleaning it off
I also used paper towels, and did both sides. I cleaned the bearing, and repacked it with moly grease. I didn't photo this part, but you have a couple of options. One is to use a needle on the grease gun. Another is to use a bearing packer and hook it up to the grease gun and the last is to use the "old fashioned method" by hand. To do this start with a clean bearing, but some grease on the heel of your hand, and nibble into it using the outer wide edge of the bottom of the bearing.. pushing the grease up through the bearing with successive small "bites" as you push down into the grease. Continue until it comes out the other side.
You can now insert the bearing into the rotor
Next carefully put the seal in place... level onto the bore.... don't get it ****ed.
NOW.... you can use a hammer and pound it down by hitting it all around the circumference... be careful not to misalign it. Or they make tools (this one was $10) that come with a zillion sized front pieces. Pick the one that fits your outer bearing diameter and a couple smart whack will drive the grease seal right in. Not essential, just nice.
Here is the bearing and seal all in place... the rotor is ready to go on the spindle.
I'll clean it once more...
Normally I'd prepare the caliper assembly at this point, but since we are talking ROTOR, let's put it on...
Clean the spindle (wiping it clean is enough) and install the rotor onto the spindle...then add the front side bearing (cleaned and relubricated as before with the rear)
then add the nut...tighten it hand tight
Notice the clean hands? I cleaned my hands before greasing the bearings, and then again after to clean the rotor. Brake jobs usually involve getting your hands incredibly dirst repeatedly, or I've recently taked to using latex disposable gloves (didn't have them for this job)
The bearings need to first be "seated" and then properly tightened. You can do this with your hands and a large water pump plier, but I have the proper tools so let's see how this all works...
Here are the tools (if we are going that route)
an inch lb torque wrench adapters and the 2-3/8's socket. Initially I tighthened the bearings to 20 FOOT pounds while I rotated the rotor... then I backed it off, and tightened it to 20 INCH pounds (finger tight basically... just using the tips of your fingers).
Next I inserted the little keeper... it might need you to adjust the nut slightly to get it to fit... that's ok.
Next the inner hub assembly... make sure the little square in lined up with the keyway (you can't get it wrong, just waste tome time trying to figure out why it isn't going on)
slide it on as far as you can. You will feel the garter spring starting to resist your effort. Get a socket that JUST fits the inner part of this hub (or a suitable pipe) and one whack with a hammer and voila! It's on.
Next the washer
Here is a pic showing iinstallation of the snap ring. Don't panic when you go to install the half snap ring... and find the slot is not wide enough. That shaft slides in and out.. pull it out and voila, you have the full slot to put the snap ring back into!
Here we are, all back together (top arrow shows washer, lower arrow snap ring, and in and out arrow as a final reminder that the shafy will move in and out slightly)
The outer hub you may have to rotate until it seats. There may be slight spring pressure holding it SLIGHTLY proud, but play with it and you'll know what the proper position is when you find it.
Ok let's turn our attention to the caliper. The outer pad is held into the caliper by two spring steel "ears" It's not tough to remove. The rear pad will stay in the caliper mount you have to reach back and slide it out... also easy.
WHen you have the pad gone, you have a piston extended to accomodate wear. The new pads will be full thickness, meaning your piston needs to go back IN to it's bore... There are several ways to do this. A Big C-clamp is an easy one. Large water pump pliers (used carefully) work. You MIGHT get brute force to work. Easiest of all is a tool made JUST for this purpose. It costs $35 or so. Here is that tool kit...
Here it is installed prior to pushing the caliper piston back in
NOW..THIS IS IMPORTANT! You will need space for the brake fluid in the master cylinder reservoir. So, before you push the caliper back, remove some fluid (good old turkey baster - useful tool). I usually remove as much as I can and use this opportunity to add fresh brake fluid to the reservoir.
[NOTE] Here is something I never thought of on the newer vehicles with AWABS... probably good advise for ALL ABS cars (even an old DOG learns thing from this forum. This is from CDW6212R:
Tips: On ABS vehicles, don't push the calipers back in with the bleed screws closed. The fluid in the calipers is the source of dirty fluid, which can ruin the ABS pump. Always open those bleed screws while compressing the pistons
Great tip, thanks CDW !
Continuing:
Don't get this on your paint!!
Once you have done this.. push away. Here is the piston fully retracted.
Now the fact I wore out pads on one side with a lot of lad left on the other means the caliper was stuck.... SO I wanted to clean up the grooves on both parts... first the caliper itself
and then on the mount, which I reinstalled using blue locktite... THIS IS IMPORTANT
here is the cleaning of the groove on the mounting side
Once cleaned I lubed the grooves (and cleaned up the slide pin and lubed it too) with caliper slide grease - then I cleaned my hands, again. With clean hands, I slide the back pad into place - the triangle shows the slot (there is one top and bottom) that the pad slides into. I also added some anti squeal good in the area where the caliper piston encounters the pad. The square indicates you slide it in (duh).
Now put the dog eared pad onto the caliper... and slide it into place in the mounting bracket attached to the vehicle.... next we drive the lubricated caliper slide pins back into place... they will stop once they are in...
Recheck the brake fluid in the master cylinder. Put the tire back on... have a cold one - YOU ARE DONE!
Oh and, this thread is PROOF I DO get my hands dirty! Speaking of which, get some goop, or other hand cleaner, and pick up some disposable gloves... you will be glad you did. This is a DIRTY job.
[Edit] Someone asked the costs. The new Rotor from Autozone with races was $35. The seal was $9. Pads, well a set will run between $40 and $60 depending. You will need 2-3 cans of brake cleaner, ($7 or so total - unless you do like me and buy a case when a great sale comes along and can get it half price) Also some caliper slide lube (.99) and some wheel bearing grease ($4-5). A can of brake fluid might be added to the list as well ($3)... oh and don't forget hand cleaner, you will NEED IT !

")


