1999 Mounty 5.0 aka My Great Bad Idea | Page 36 | Ford Explorer Forums - Serious Explorations

  • Register Today It's free!

1999 Mounty 5.0 aka My Great Bad Idea

Very interesting if you have ever held a inertia switch and tried to “trip it” you would see how that is fishy
I mean I’m sure something happened but they don’t just trip with a tap the ball has to leave it’s pocket

Glad it’s sorted! Keep eye on fuel pump relay ;)
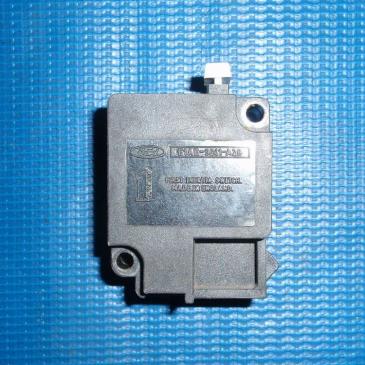
Interesting. So not something that would happen from a wrench handle impact or raising the vehicle on a jerky lift?

How exactly does the fuel pump relay "communicate" with the switch? I'm guessing when the key hits the run position, the relay closes, sends voltage through the inertia switch, then to the fuel pump. Would a relay on its way out actually be able to trip the switch?


Join the Elite Explorers for $20 each year.
Elite Explorer members see no advertisements, no banner ads, no double underlined links,.
Add an avatar, upload photo attachments, and more!
.


No but they could be mistaking a “tripped inertia switch” For what was really a power issue elsewhere (relay) , or a simple chip key in the ignition/ pats issue (99 disables fuel pump)

That lift would have to be really jerky, basically inertia switch h trips when it’s rolled over

Intermittant relay is most likely unless your intertia switch is just finicky? At least if it happens again to you know you know where to look

The fuel pump relay is powered on with the eec relay and then triggered by the pcm. The ground is allowed by the pats. The pump power from the fuse travels through the relay and then through inertia switch back to the pump


Okay, he did say the theft light was going nuts when they were trying to start and it just kept cranking. But then he said they reset the inertia switch and it was fine. Interesting...

PATS will be going away when the Mounty goes manual, but I'll definitely keep tabs on the fuel pump relay. If it acts up again, I'll swap the relay with one from my parts bin.


Good info here


I had the inertia switch in my bronco go bad once, I think it was corrosion inside wet interior? Anyways I bypassed it by cutting the two wires and hooking together, got me home… which was awesome because my son was like 6 months old and in the backseat and it was hot out

Otherwise I’ve never seen one fail

They trip when vehicle is hit hard or flips
I cannot imagine the ball jumping out of the socket with just the tap of a wrench or jerk of a lift.


Great article!

Yeah, I agree it seems doubtful anything the shop did triggered the switch. But then again, they said hitting the reset resolved the no start issue...?

It's possible my switch got some moisture in it when I had the heater core out and a bunch of snow blew in under the dash over the winter. I didn't have a battery in at that point though, so I wouldn't have expected anything in the switch would have gotten "fried." Maybe just a little corrosion? That also seems unlikely on what are probably tin-plated switch contacts.

I'll keep an eye on it and a spare relay in the glovebox. Might pick up a spare inertia switch next time I'm at the salvage yard too.


Paperclip can bypass inertia switch in a pinch


In the spirit of a Friday heading into a holiday weekend, I got some good "work" done at the office this morning. This 5/8" rod is bent for my 4406 Tcase-to-1354 bezel shifter arm.
PXL_20240524_174008080.jpg


I'll do a test fit, then mill and drill next week. I'll be sleeving and welding on the end of the stock 4406 lever which has the splines to press the knob over and the flange to keep the boot in place.


It's getting hotter these days and harbor freight had a vacuum pump $30 off for memorial Day so I think the universe is telling me to fix the Mounty's AC. For those who don't recall, I bought it with a big hole in the condenser which I then replaced during the engine refresh.

I've read a couple good threads and it sounds like the move is:
  1. Blow out old oil. Some came out with the old, damaged condenser, but the evaporator and accumulator surely still have some.
  2. Pull a vacuum to remove moisture. Make sure vacuum holds for an hour, otherwise seals likely need replaced.
  3. If vacuum holds, refill with 30oz R134a and 9oz PAG oil.
A few questions:
  • Do I need to replace the accumulator? Some folks mention this as a hard rule, others don't.
  • Should I use a specific weight of PAG oil? 46 and 150 are available locally. I haven't seen the actual weight mentioned, just 9oz.
  • If I'm using 12oz R134a cans, how do I know when I'm halfway through the third can and need to stop? Is there a target pressure for the high or low side to watch for?
Thanks in advance !


You weigh the cans with a scale we are adding refrigerant by the ounce

Will will also want to clear or replace your orifice tube this is the regulator for the ac lines it acts like a filter and picks up all the debris

When was the last time this system worked?
How long was it open to atmosphere?

I usually replace the compressor and dryer l,
Replace or clean orifice tube
Clean all lines with air, hook it all up and start the vacuum
A few Minutes is usually enough to spot any vacuum leaks of your needle is accurate, most of them will show up immediately. So instead of spending 45 minutes with the first vacuum pull I will allow the pump to run for like 3 minutes, watch the ne dale get to neg and peg, then check for holding vac pressure. Any leaks fix now, none go ahead and vacuum the system for 15-30 min to get all the air and moisture out

If you reuse the old compressor/ known good one and dryer then there is already pag oil in the e system and no need to add the full 8oz or whatever the hood sticker calls for
New and reman compressors usually come pre charged also
Easy to add too much oil

Most leaks are usually at the compressor o rings or at the high and low pressure ports valve cores themselves


When was the last time this system worked?
Probably years ago.

How long was it open to atmosphere?
Maybe years since the condenser was punctured. It was fully open for a few months during the engine refresh although I did keep shop towels in all the open ends of hose to prevent debris from getting in.

I'll look into cleaning the orifice tube.

Any way to evaluate a good/bad dryer?

I should also probably ask: is there a way to check if the compressor is good before I potentially waste time/money/refrigerant?


After doing some more research, I think it probably makes the most sense to just get a kit with the accumulator, orifice tube, and new o-rings. For $30-35, it seems like that'll be money well spent.

With the accumulator removed, I can easily blow residual oil out of the evaporator. I know my new condenser is clean, so that just leaves any remaining dirty oil in the compressor and lines attached to it. Can I just disconnect the lines from the compressor and blow them out? If the compressor is removed, can it be stood on end to drain old oil out?


Yes on the lines

I’ve never tried to drain a compressor but I can tell you some oil will come out yes
Remove the orifice tube before you clean out any lines

Sounds like a great plan

These ac systems are pretty tough, once you clean them up and refresh they can last for many many years


I need to order that accumulator kit.

Last night I washed the Mounty for the first time since I bought it ~10 months ago and I was surprised how well it cleaned up. If it weren't for the chewed up rockers and bubbling right rear quarter, I'd almost call this thing nice.
1000001409.jpg


Stock suspension flexin' because it's funny.
1000001407.jpg

1000001408.jpg

At least I can get through this trench in the middle of our field without dragging!

When I went to pull out of the trench, I thought a wheel was slipping in the dirt. Backed up then powered through. But then when I was backing onto the slab where I park the truck, I felt slipping again...I think it's actually the trans. M5R2 swap here we come! I'll be heading to the salvage yard next weekend to grab the last few things I need: 4.2/4.6 front drive shaft, spare trans crossmember, and some other misc tidbits.


4406 adapter handle rev 1 is mocked up
1000001410.jpg


I say rev 1 because I learned how to use a bender while making it and could definitely do it better now that I know what to do. I'm going to keep messing with this one, but probably make an improved version once the M5R2 is installed and I can be more sure of what fits and where.


1st gear clears it? Lol nice work

You will love 5.0 5 speed


Yep, trans is in 1st in the picture.

I've been referencing 1354 pics to try to ballpark the height for the tcase shift knob -- I'm surprised how low it sits.
1716987130291.png


The struggle with this design is making the Z bend high enough to not bottom out on the mounting plate in the 2wd position and also low enough to not hit the floor going into 4 low. It's really close on both ends and I'm expecting to have to make adjustments once I'm dealing with a real floor pan instead of an imaginary one. Yes, I could holesaw the floor and run an f-series 4406 bezel, but I think the 1354 boots just look cool!

I cannot wait to get a third pedal in the Mounty!


I recently built and sold a 99 ranger 3.0 5 speed manual. Driving it around i could
Not believe how short the shifter was and how far my arm had to reach.. been driving our 5.0 5 speed sport trac for a year now. I prefer the longer f150 style shifter. My shifter was chop cut and welded but it works perfectly. It is about 6”
Taller then the factory ranger shifter was lol


Back
Top