- Joined
- June 16, 2003
- Messages
- 31,634
- Reaction score
- 3,292
- City, State
- Humboldt, KS
- Year, Model & Trim Level
- 2000 Mounty
Center console removal
Tools required
1/4" ratchet
extensions (optional but very helpful)
8mm socket
10mm socket
magnetic pickup
wood block
hand sledge (or big hammer)
Step 1
Remove tissue box-coin holder
Step 2
remove the cubbyhole compartment by pulling up and toward you

Step 3
remove cup holder piece

Step 4
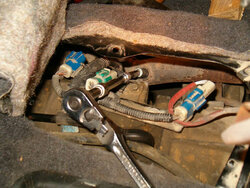
Remove 2-8mm bolts
loosen the 10mm connector retaining bolt.
Disconnect this connector and route up under the heater controls to move it out of the way temporarily.

Step 5
Remove 2-8mm bolts in the console. These are threaded into the transmission hump

Step 6
use a wood block against the metal bracket, and hit hard with a hammer toward rear until the console moves back about 2 inches. Note how the rear legs ( or feet ) go under metal tabs in the hump for re assembly

To help a stubborn one get out-
If you look real close--at the bottom edge of the console toward the rear is a small cut out--raised edges area. You can get a screwdriver up in there and press upwards on the release tabs, then push the console back toward rear of truck.
# View attachment 195123
Installation is reverse of removal.
For a more in depth procedure--go here for seat and interior panel removal. This will help you deal with the carpet without cutting it.
Tools required
1/4" ratchet
extensions (optional but very helpful)
8mm socket
10mm socket
magnetic pickup
wood block
hand sledge (or big hammer)
Step 1
Remove tissue box-coin holder
Step 2
remove the cubbyhole compartment by pulling up and toward you
Step 3
remove cup holder piece
Step 4
Remove 2-8mm bolts
loosen the 10mm connector retaining bolt.
Disconnect this connector and route up under the heater controls to move it out of the way temporarily.
Step 5
Remove 2-8mm bolts in the console. These are threaded into the transmission hump
just a heads up in the 95,96 there is a little light in the cup-holder section of the console that you will need to release to get it out(its just a little tab).
Step 6
use a wood block against the metal bracket, and hit hard with a hammer toward rear until the console moves back about 2 inches. Note how the rear legs ( or feet ) go under metal tabs in the hump for re assembly
To help a stubborn one get out-
If you look real close--at the bottom edge of the console toward the rear is a small cut out--raised edges area. You can get a screwdriver up in there and press upwards on the release tabs, then push the console back toward rear of truck.
# View attachment 195123
Installation is reverse of removal.
For a more in depth procedure--go here for seat and interior panel removal. This will help you deal with the carpet without cutting it.
 now maybe I can go try again.
  Nice write up, glad you did it.


