Vehicle: '98 Ford Explorer XLT
Before:

After:

Equipment Using:


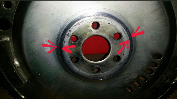
Marked the cuts needed to fit the projector's in the housing's.


Removed the front lens's off the headlights; 300 degrees for 4 minutes in a gas stove. I used 2x4 pine wood to keep it off the grates but kept a close eye on it.


Some more cutting and notching of the housing has made the projector fit pretty nice but still with some room to adjust for final aim.


Parts left over from the housings:

Materials for the vacuum form setup:


So I used some old scrap of MDF 5/8" thick as the base for this. The frame and base is marked out 22" x 18".

I off centered the suction tube so that I will have a flat area to work from. At least this is the plan, hope fully it will work.

Purchased this vacuum hose size reducer at my local Home Depot and cut off what was not needed.

All my frame pieces all cut up.

Recessed the screw head for a nice flush fit.

The rubber mat is for pre-installation for showers using tile. Was also purchased at The Home Depot. Then stapled the mat to the base.

Trimmed out the suction tube and excess rubber mat with a razor blade.


Silicon around the suction tube in place.

Foil tape layer over the staples base frame.

Frame altogether but missing the form material.


First off I added some pvc pipe reducers to the back side of the housing. The reason is, is that the wiring and bulb would not clear prior and plus it add as a simple access point to the inside. Measured, dremeled and attached.


I attached the PVC to the housing first by 2 screw’s from the inside.

I hung the projector from the top side of the housing with aluminum brackets. The bottom of the projector is supported by 3" screws from the backside of the housing with a aluminum cylinder JB welded.


Ordered my material for the vacuum form Monday and picked it up today. Ordered it through a local supplier (Grainger - http://www.grainger.com/Grainger/items/3GXZ8). Came out a little under $50.00 US for the sheet. It will give me 10 pieces total once I cut it up.
Specs:
Hi Impact Polystyrene, White Color, Thickness (Decimal) 0.060 In, Width 48 In, Length 96 In, Min Temp Rating -40 Deg F, Max Temp 180 F, Tensile Strength 3000 PSI

Cut it up with a simple razor blade and used a straight edge (4')


Closed up the remainder of the headlight enclosure before using the vacuum form. Used JB-Weld for misc holes and etc. Also used red Lock-tight on all the screws.


Bake: 350 Degrees for 3 minutes

Setup: vacuum hooked up to bottom of vacuum form


First try, I attempted to try to make both shrouds at one time with a single sheet.

...and it failed. Not enough suction.

Second attempt, went better...


and it also failed, too much suction for this shroud.

So I decided to some way limit how much it could actually form into the housing. Cut up some spare plastic and placed in the housing and around the projector.


Some people do not care for the finished product of this vacuum form of plastics, but these shrouds came out exactly how I wanted!


The making of the heat shields:


Used high heat tape to tape the head shields on the housing until I vacuum formed the outer seal on.


All ready to vacuum form. Of course I forgot to take pics of it all before it was cut up.


Plastic all trimmed up.


The inner shrouds all painted and installed. It’s a very nice fit and is very tight around the projector. Used a dremel and a light grit sand paper for the tight fit & look around the projector.


Nissan sealant all installed and ready to seal up with the lens.


Before:
After:
Equipment Using:
- - FX-R projectors
- Clear Chrome Headlight Housing's
- Slim Digital HID Kit (Color: 6000k / Bulb: D2S)
Marked the cuts needed to fit the projector's in the housing's.
Removed the front lens's off the headlights; 300 degrees for 4 minutes in a gas stove. I used 2x4 pine wood to keep it off the grates but kept a close eye on it.
Some more cutting and notching of the housing has made the projector fit pretty nice but still with some room to adjust for final aim.
Parts left over from the housings:
Materials for the vacuum form setup:
So I used some old scrap of MDF 5/8" thick as the base for this. The frame and base is marked out 22" x 18".
I off centered the suction tube so that I will have a flat area to work from. At least this is the plan, hope fully it will work.
Purchased this vacuum hose size reducer at my local Home Depot and cut off what was not needed.
All my frame pieces all cut up.
Recessed the screw head for a nice flush fit.
The rubber mat is for pre-installation for showers using tile. Was also purchased at The Home Depot. Then stapled the mat to the base.
Trimmed out the suction tube and excess rubber mat with a razor blade.
Silicon around the suction tube in place.
Foil tape layer over the staples base frame.
Frame altogether but missing the form material.
First off I added some pvc pipe reducers to the back side of the housing. The reason is, is that the wiring and bulb would not clear prior and plus it add as a simple access point to the inside. Measured, dremeled and attached.
I attached the PVC to the housing first by 2 screw’s from the inside.
I hung the projector from the top side of the housing with aluminum brackets. The bottom of the projector is supported by 3" screws from the backside of the housing with a aluminum cylinder JB welded.
Ordered my material for the vacuum form Monday and picked it up today. Ordered it through a local supplier (Grainger - http://www.grainger.com/Grainger/items/3GXZ8). Came out a little under $50.00 US for the sheet. It will give me 10 pieces total once I cut it up.
Specs:
Hi Impact Polystyrene, White Color, Thickness (Decimal) 0.060 In, Width 48 In, Length 96 In, Min Temp Rating -40 Deg F, Max Temp 180 F, Tensile Strength 3000 PSI
Cut it up with a simple razor blade and used a straight edge (4')
Closed up the remainder of the headlight enclosure before using the vacuum form. Used JB-Weld for misc holes and etc. Also used red Lock-tight on all the screws.
Bake: 350 Degrees for 3 minutes
Setup: vacuum hooked up to bottom of vacuum form
First try, I attempted to try to make both shrouds at one time with a single sheet.
...and it failed. Not enough suction.
Second attempt, went better...
and it also failed, too much suction for this shroud.
So I decided to some way limit how much it could actually form into the housing. Cut up some spare plastic and placed in the housing and around the projector.
Some people do not care for the finished product of this vacuum form of plastics, but these shrouds came out exactly how I wanted!
The making of the heat shields:
Used high heat tape to tape the head shields on the housing until I vacuum formed the outer seal on.
All ready to vacuum form. Of course I forgot to take pics of it all before it was cut up.
Plastic all trimmed up.
The inner shrouds all painted and installed. It’s a very nice fit and is very tight around the projector. Used a dremel and a light grit sand paper for the tight fit & look around the projector.
Nissan sealant all installed and ready to seal up with the lens.
 very nice man! im new here and maybe this was asked before but I love your bumper where can I get one....