#23-1973 ford Torino round track car-SOLD | Ford Explorer Forums - Serious Explorations

  • Register Today It's free!

#23-1973 ford Torino round track car-SOLD

allmyEXes

Elite Explorer
Joined
February 6, 2016
Messages
2,435
Reaction score
1,539
City, State
No. Alabama USA
Year, Model & Trim Level
1997 Blue Ex 4.0 SOHC
Callsign
KAGG 3611 (CB)
23torino01.jpg

Originally put together in 1991. Pulled out of the back lot in late fall 2022.
Amazingly, this racing class still exist at the local speedway, and the rules haven't changed much since.
We don't intend to race it however we are going to do a little bodywork to it and paint International Harvester Red with a gallon of straight enamel, a pint of hardener and a little reducer. The paint was purchased at Tractor Supply so it is readily available for touch ups. It will be for sale, then someone else can make it race ready by fabbing in a new floor and install a 351 (5.8 out of a mid 80's Ford pick-up) and 3 speed toploader. The 1/4-mile round track is so short that you leave it in 2nd gear and floor it. Of course it will need a few other things too. If you are a young WS (whipper snapper) that knows his way around older American cars and own a Mig welder, then this could be a fun project for you (Lee's Automotive). This could be an excellent rolling advertisement for your business.
Below is a link to Super Stock rules for HMS.
Huntsville Motor Speedway-Sportsman Rules


Join the Elite Explorers for $20 each year.
Elite Explorer members see no advertisements, no banner ads, no double underlined links,.
Add an avatar, upload photo attachments, and more!
.


@Fix4Dirt Today, Tuesday here in north Alabama we are going to reach a high of 60 degrees. That will be warm enough for me to sandblast some of the worst spots on the outer body and get them primed in with epoxy primer prior to body working them with plastic filler. This may take two separate good weather days to accomplish. The speed at which I can get to the actual painting depends on whether our winter weather cooperates or not. I would like to spray it well ahead of pollen season because it will be painted outside or in a makeshift plastic booth in part of the new carport. F4D, go back and read my 1st page, I added a few sentences.


A lot of cool cars in the back lot. I'm wondering when you are going to get the green straight arrow van back on the road?


Josh got the 10 cent tour. It used to be the nickel tour before this most recent inflation.
@Josh P The Green Dodge (the "P" wagon) on the north path near the back Sea (C) box and 1960s mobile home? Or the old 63 Econoline way west in the back behind Dustin near his Cadillac hearse?


The dodge P shaggin wagon.


The '74 Dodge van body may have too much deep pitted surface rust to be an economically viable project. I have had thoughts of moving it to right near the shop and sandblast area to store all of the hard parts ie manifolds, brackets etc, that are currently in an outdoor pile awaiting sandblasting. We have recently improved our blasting capabilities. We still need a 4 pallet storage area to put 4 2-3000 pound bags of sand that we would need a Hot Shot Hauler to bring the 4 bags 350+ miles up from Mobile, AL. A big one time investment for the sand and transport. Oh yeah, and a forklift on this end to unload them.


A few pics from 1-10-23
23w1.jpg

6 weeks ago, I/we sandblasted, hand sanded, primed and painted 2 of the wheels. 2 to go.
23int1.jpg

A picture looking through the windshield opening towards the seat bracket. You can see that the floor needs some patching.
23dash.jpg

Pic of the aluminum dashboard
The amber light was hooked up to an oil pressure switch for a gauge. If oil pressure was lost, the light would come on.
Aluminum dash with 2 holes on the far left for oil pressure and temperature gauges. 3 holes on the right are to vent the backside of the DuraSpark module. I see the holes for the power toggle and push button starter. 2 holes to the right of the 3 holes are for the starter solenoid. There is plenty of room for a tachometer to be installed above the steering mount notch. The extra 3 little holes on the far right are for a 2nd DuraSpark Module.
Tomorrow I'll post some of the sandblasting spots and body filler work.


The $64,000 question is, what is the asking price?


$2400- with racecar bodywork and racecar tractor paint, paint job. I'm going to try to paint it. Ken does all of our restoration body and paint on the 1965s to 1970s classic Mustangs. I am just fixing up the outside of the #23. There will be a lot more work to be done to it to make the roller a racer.
Someone will have to Fix the floor, come up with a drivetrain, build an exhaust system, purchase tires, load the dash, build the brakes, etc. I'm strictly doing the body and paint and paint the wheels. I am not a painter so it will be you see what you get.


Tuesday afternoon 1-10 and Wednesday 1-11, I did what sandblasting that I had enough sand to do. There are all kinds of mediums available but for scaley rust. Sand or coal slag is the best to use. I was blasting the worst rusty spots on the body and where I need to weld the steering column bracket to the roll cage. No pictures available of this at this time.
Thursday after the initial flood, the leftovers of the latest atmospheric river to hit California, I started the machine sanding with the orbital sander. I'm just trying to feather out what paint is on the old Torino and remove all of the old decals. This is nowhere near the process that would be done during the process of restoring a classic. This is race car bodywork and paint. It is probably the same process that repairing and refinishing a taxicab would go through. Fast and shiny. I wasn't able to roll out to get better pictures with the recurring thunderstorms of yesterday. Here are a couple taken from my cramped workspace. The right fender being sanded down and some body filler work where the marker light was sectioned out of the fender. The fender is ~ 7" shorter than stock. The bumper has been gutted and moved back too.
23rfen.jpg

Some race officials might frown a bit about the sectioning. However, when you tell them that you are a foot further from the finish line then
they would seem to be able to go along with it. That's if they even notice. The foot that I'm talking about is the cut out marker light section
and the amount of bumper set back added together.
23fro.jpg

A view of the front bumper and header. Before I left work Thursday 1-12-23 I sanded all the way to the right rear quarter opening.
Today, Friday, I will be working on a 1965 coupe inside where the heat will be on. It will be 41F for the high. I will be back on this next Tuesday; however, I might sand about 30 mins to finish the right quarter panel.


A picture of some '65 Mustang parts that I blasted Wednesday when I was blasting on the Torino.
23sb65x2.jpg


This morning after logging out from here to go to work on a Sunday to make up for no progress on Friday, It was 29 degrees F. I was determined to do some orbital sanding on the #23 Torino. I had on thermals and jeans and up top a long sleeve t-shirt, a short sleeve t-shirt, a new zipper hoody, my ragged blue jean work jacket and a barely worn military field jacket. With the ear protection to keep the very loud Hutchins orbital sander from making me anymore hard of hearing than I already am, along with the N-95 mask to keep from inhaling lead paint dust from 30 to 45 years ago and old bondo dust too, I was warm enough. It was 34F by the time that I started sanding and the sander would freeze up from the moister coming out of the compressor with the air. An ice crystal would blow out of the sander exhaust, then it worked again. It was better as the outside temperature came up.
23-sun1.jpg

That sander was bought new in 1989 I think, after getting tired of cheapy's only lasting their $10- worth. The Hutchins was $139- in 1989.
I wonder if they still make that model? Answer Hutchins 4500 The handle on the orbital is an extra ~$23-.
23sun2.jpg

#23 has turned in to #2 for a bit
23-sun3.jpg

There are several places that I could use some 36 grit. All I have that I have been working with is 80 grit.


23mon16.jpg

#23mon16


I'm still sanding and wiping body filler and sanding... The right-hand sail panel had some old filler peeling up from rust under it. I sandblasted that spot like many others. Remember, this is racecar body work. If it was going to be restoration of a classic, a repair panel would be cut and fitted to a hole where the rust was cut out. Picture is after the blasting was done.
23rsp1.jpg

I'm just going to use body filler to patch it up. It's just a racecar that will get beat up anyway.
23rsp2.jpg

After the first 'wipe' and some sanding. This spot will probably be wiped and sanded a couple of more times.
23rfender.jpg

This is where the fender skin and door skin were welded together in 1991. I'm liking how the right fender is looking. I know how to rough in body filler after panel replacement. In a antique restoration situation, I would pass this to the finish bodywork department to do the finish bodywork then paint.
I'm working on several more spots on the right-hand side. I'll do the left after this side is done. I'll have to slide the car over 3 feet to be able to work on the left side. Hopefully I will be epoxy priming the right side soon.


I like hearing about old race cars, and the wild things you can do to them. I'd love to section out about a foot from my 72 front end, I'd imagine 3" from the wheel well center, 6"+ in front of that, and about 3" behind the wheel. The front end is way too long on those cars, and the big bumper was really heavy.

Here's what the 73 front originally looked like, from my 73 Ranchero, pictured when I first got it in 2020.


73 Gran Torino or Ranchero front end.jpg


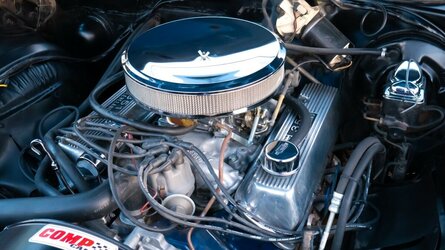
Do you not have an old Ford with a 351 Cleveland in it, which was the proper Q code engine for that? Both of my 73's came with a 351C-4V, this last one someone built the engine with closed chamber heads.


@CDW6212R I don't have any old fords with Clevelands in them. I have, however, a 1972 Cleveland with open chamber heads that I picked up years ago to put in my 1967 Fastback S code 4 speed body that was missing the drivetrain and gears out of the 9 inch when i bought it. I have a close ratio 4 speed trans that a "former" friend locked it up for me when he didn't keep gear lube in it. I don't know if I will ever be able to get the welded thing apart. It may be junk.


You can build that Cleveland to be a real beast with the better heads(closed chamber), and basic needed oil system mods, plus head updates. This truck I have as a donor, complete, I'll refresh the engine since they made it mild. I don't know if they did the oiling system work, or replaced the stock valves and seats. So I have to take it apart to check, and supposedly it's recently built, thus I expect to not have to machine rods or cylinders. I hope to just upgrade to a custom roller cam, and use an RPM Air Gap intake I got last year. I think it'll cost me about $2200 or so to move it from mild(5k shifts), to more respectable 6200-6500rpm shifts. That's for the truck I'll sell, with a 4R70W I'll build for it. A solid 4V Cleveland can make more power than the take out Coyote 5.0's everyone swoons over.

They look great too;

new 73 Ranchero GT 351-4V engine.jpg


This has been going on a week and a half not counting when the first two wheels were fixed up.
23-11.jpg

Right B pillar after several wipes
23-12.jpg

Right rear lower quarter is going to need a metal patch.
23-14.jpg

Right front fender seam is coming along nicely.
23-15.jpg

A piece of scrap 1964 Ford Falcon metal to make patches out of. It's light blue too.
23-16.jpg

I just made it in time for "prime time". I was able to get most of the biggest spots ready to be primed this late afternoon.
Some urethane priming was being done in the finish body work/paint area and the leftover in the spray gun was used on this.
23-17.jpg

Right fender door seam looking good.


Join the Elite Explorers for $20 each year.
Elite Explorer members see no advertisements, no banner ads, no double underlined links,.
Add an avatar, upload photo attachments, and more!
.


That right fender looks great, well done on the metal work.


Back
Top