Martin Torres
Elite Explorer
- Joined
- March 24, 2024
- Messages
- 13
- Reaction score
- 9
- City, State
- Woodland, CA
- Year, Model & Trim Level
- 1996 4x4 Limited
Sorry long post.....
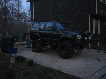
My “free Explorer” (about $1.5K into it now) had the driver’s side lean. It didn’t really have much of a rear sag but the Explorer does have the Automatic Ride Control which levels out the ride height. I carry band equipment and occasionally a load of heavy stuff. I am also 6’ 3” and weigh 240lbs and many of my friends are bigger than me. I wanted to correct the lean and get extra oomf in the rear leafs....
Decided to swap rear leafs side to side and add the Torch Off Road Add A Leaf kit advertised for the 1995 – 2001 Explorer. First off, don’t buy this kit without expecting to buy the correct center bolt, drill out the center hole, and trim the OEM dampeners on the leafs. It is also the same length as the last leaf. I called the number at Torch Offroad to make sure I had the correct kit. The guy tried to convince me the larger bolt in the kit is correct and will work. I explained that the diameter going through the springs is smaller and can cause movement and the top where it centers on the axle is smaller also. He tried to tell me that the u-bolts will hold it in place.
I have been wrenching for over 40 years and the u-bolts are not intended to keep the axle from moving horizontally, especially in a 4x4 where there will be more torque horizontally then a 2wd street ride. U-bolts hold the axle to the spring vertically. With movement comes wear, and the holes or bolt wears creating more movement and possible failure. When I told him the add a leaf was the same length as the bottom leaf he told me it had to be after market. When I told him it had the FoMoCo numbers for the leaf stamped in them, he was quiet.
He did not appreciate me suggesting he put on the add that different center bolts will be needed, you have to drill out the add a leaf, and you have to alter the bottom spring dampener nubs. I told him my rig was all apart and I was now committed to using what he sent and buy new bolts and make the alterations. I told him I was not happy and he began to suggest that if I am not happy, I can return it. I may have hung up at that point. This kit is not a simple install as they suggest. Have you ever drilled out a spring? I am sure other kits are correct and easier. Buy a different one. Ok, so with that said, I already had it tore apart when I discovered this is not a good kit for the Explorer.
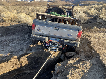
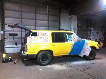
OK, rant is over.... Removing the springs is straight forward. I left the driveline attached as well as the lateral movement shock (Dampener?). All the bolts came apart pretty easy without soaking but I am in a pretty much rust free area of the country. Pulled the passenger side, clamped it together and removed the center bolt. First thing I noticed is the bottom OEM spring is the same length as the Add A Leaf. It has dampeners and the retaining nub protrudes through the last spring and is in the direct path of the dampeners on the add a leafs. As noted earlier, you have to cut the nubs that come through the spring off and make sure they are flush or below flush. I did that.
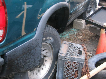
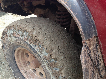
Then I compared the center bolts that come in the kit (2 sizes) and they are smaller in diameter where they go through the springs and at the centering pin where it mates to the axle. The kit has what appears to be 3/8 and 5/16. The OEM is likely metric (11 or 12 mm) but the same as a 7/16 diameter center bolt. I used Dorman 660-013 bolts. Direct fitment for the OEM bolt. The center hole on the add a leaf is 3/8. You need a good bit to drill it out. Spring steel is no joke. Hold the drill tightly as the bit catches. At this point I considered removing the last OEM spring which was the same length as the add a leaf. Knowing now that it would lift it enough to create a small rear to front rake, I would try that. I may even dig back into it and see the difference. I am including a pic of the difference of the spring heights side by side.
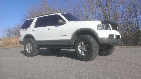
It went back together pretty easily and the lean is gone. Picked up about 2” in the rear and as noted before, has a a slight rake to it now. I need to research if there is a way to calibrate “zero” on the auto ride control or just fabricate new brackets. Took for a ride and the bounce is gone and the lean in cornering is much better. The ride is actually smoother as it doesn’t bounce any more. I loaded it up with ten 40 lb bags of salt (400 lbs) and 3 cases of pool chemicals (approx. 100 lbs). Barely made a difference and the air pump never cycled so it probably is still above stock ride height.
So overall I am happy the left lean is gone and the ride is smoother and stiffer. I repost an update if I remove the bottom OEM spring


My “free Explorer” (about $1.5K into it now) had the driver’s side lean. It didn’t really have much of a rear sag but the Explorer does have the Automatic Ride Control which levels out the ride height. I carry band equipment and occasionally a load of heavy stuff. I am also 6’ 3” and weigh 240lbs and many of my friends are bigger than me. I wanted to correct the lean and get extra oomf in the rear leafs....
Decided to swap rear leafs side to side and add the Torch Off Road Add A Leaf kit advertised for the 1995 – 2001 Explorer. First off, don’t buy this kit without expecting to buy the correct center bolt, drill out the center hole, and trim the OEM dampeners on the leafs. It is also the same length as the last leaf. I called the number at Torch Offroad to make sure I had the correct kit. The guy tried to convince me the larger bolt in the kit is correct and will work. I explained that the diameter going through the springs is smaller and can cause movement and the top where it centers on the axle is smaller also. He tried to tell me that the u-bolts will hold it in place.
I have been wrenching for over 40 years and the u-bolts are not intended to keep the axle from moving horizontally, especially in a 4x4 where there will be more torque horizontally then a 2wd street ride. U-bolts hold the axle to the spring vertically. With movement comes wear, and the holes or bolt wears creating more movement and possible failure. When I told him the add a leaf was the same length as the bottom leaf he told me it had to be after market. When I told him it had the FoMoCo numbers for the leaf stamped in them, he was quiet.
He did not appreciate me suggesting he put on the add that different center bolts will be needed, you have to drill out the add a leaf, and you have to alter the bottom spring dampener nubs. I told him my rig was all apart and I was now committed to using what he sent and buy new bolts and make the alterations. I told him I was not happy and he began to suggest that if I am not happy, I can return it. I may have hung up at that point. This kit is not a simple install as they suggest. Have you ever drilled out a spring? I am sure other kits are correct and easier. Buy a different one. Ok, so with that said, I already had it tore apart when I discovered this is not a good kit for the Explorer.
OK, rant is over.... Removing the springs is straight forward. I left the driveline attached as well as the lateral movement shock (Dampener?). All the bolts came apart pretty easy without soaking but I am in a pretty much rust free area of the country. Pulled the passenger side, clamped it together and removed the center bolt. First thing I noticed is the bottom OEM spring is the same length as the Add A Leaf. It has dampeners and the retaining nub protrudes through the last spring and is in the direct path of the dampeners on the add a leafs. As noted earlier, you have to cut the nubs that come through the spring off and make sure they are flush or below flush. I did that.
Then I compared the center bolts that come in the kit (2 sizes) and they are smaller in diameter where they go through the springs and at the centering pin where it mates to the axle. The kit has what appears to be 3/8 and 5/16. The OEM is likely metric (11 or 12 mm) but the same as a 7/16 diameter center bolt. I used Dorman 660-013 bolts. Direct fitment for the OEM bolt. The center hole on the add a leaf is 3/8. You need a good bit to drill it out. Spring steel is no joke. Hold the drill tightly as the bit catches. At this point I considered removing the last OEM spring which was the same length as the add a leaf. Knowing now that it would lift it enough to create a small rear to front rake, I would try that. I may even dig back into it and see the difference. I am including a pic of the difference of the spring heights side by side.
It went back together pretty easily and the lean is gone. Picked up about 2” in the rear and as noted before, has a a slight rake to it now. I need to research if there is a way to calibrate “zero” on the auto ride control or just fabricate new brackets. Took for a ride and the bounce is gone and the lean in cornering is much better. The ride is actually smoother as it doesn’t bounce any more. I loaded it up with ten 40 lb bags of salt (400 lbs) and 3 cases of pool chemicals (approx. 100 lbs). Barely made a difference and the air pump never cycled so it probably is still above stock ride height.
So overall I am happy the left lean is gone and the ride is smoother and stiffer. I repost an update if I remove the bottom OEM spring